Beauty, Uncategorized

Makeup Monday: Current Favorite Foundations

img_1949

There are so many foundations on the market and it can be super overwhelming to make a decision. Foundation preferences are also very personal. Do you want light, medium or full coverage? Radiant, natural, satin or matte finish? Is your skin dry, oily or combination? What type of formula – powder, liquid, cream? And then there’s finding the right color match! Absolute overload of decisions. My number one recommendation for buying foundation is this – if you are buying a high end foundation, go into a store like Sephora or Nordstrom to have an associate color match your skin and get a few samples of different foundations to try at home first. This will give you the opportunity to test drive each product a couple of times and decide which is right for you.

If you are on a smaller budget and want to purchase a drug store foundation, I recommend buying from Ulta or Target because they are really flexible when it comes to returns. Just keep your receipt and even if you have opened it and used it a few times, they will still accept the return if you change your mind.

I have mostly dry skin, but I can get oily in my t-zone, especially during the summer. That said, my foundation choices tend to be on the natural to dewy side because most matte formulas cling to my dry areas and look patchy. If you have oily skin, the liquid foundation options below may not be your best choices, but that’s not to say that you couldn’t try them and see how they work for you. You will probably just need to use an oil controlling primer and set your oily areas with powder for these foundations to work for you.

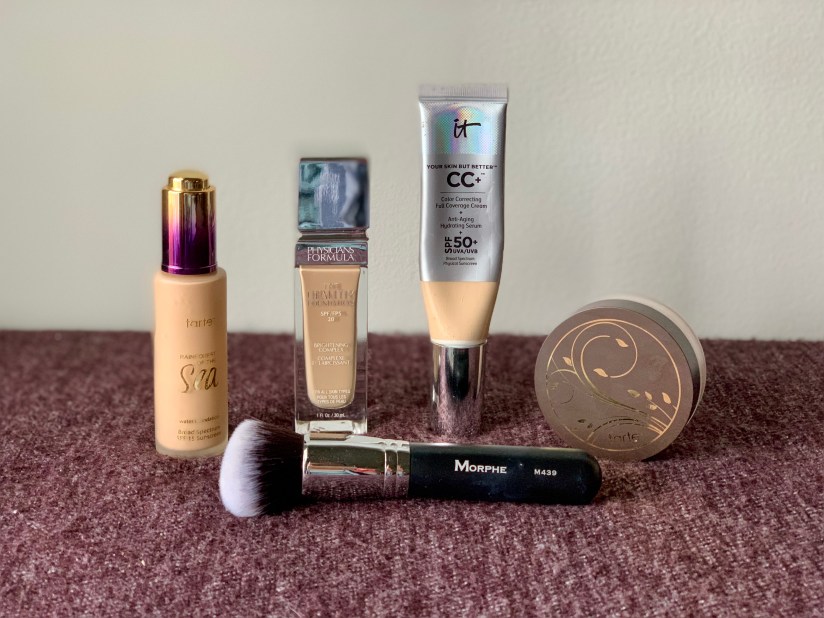
Tarte Rainforest of the Sea Water Foundation ($39) :: There is something really magical about this foundation. You can layer it to get more coverage, but it still looks seamless and skin-like. At the end of the day, my skin will look dewy, but not greasy and it doesn’t break apart like some foundations do after a few hours. This is my go to choice for a nighttime makeup look. I wear Light Neutral in the summer and fair light neutral in the winter.

it Cosmetics Your Skin But Better CC+ Cream ($38) :: I love that this foundation has SPF 50. It’s great for summer days when you’ll be outside. I also love the coverage – it is medium to full coverage which is impressive for a CC cream. Fair Light is my perfect shade match, but I also use Fair to mix in with other foundations that are a touch too dark.

Physician’s Formula Healthy Foundation ($12.99) :: I’ve mentioned this foundation on here a lot because this is my number one choice for daily use. It wears beautifully all day long, looks like skin but still has great coverage. Bonus, it has SPF 20. The other great thing about this one is that stores often run specials of Physician’s Formula products (specifically buy one get one 50% off). I don’t know about you, but I can definitely get behind a foundation that I can snag for under $10! I wear shade LN3.

Tarte Amazonian Clay Full Coverage Airbrush Foundation ($36) :: Do you remember about 10 years ago when that Bare Minerals loose powder foundation was the jam?? This is a similar product, but better in my opinion. I like this foundation because it’s really easy to apply and layer to the level of coverage that I want. It’s best applied with a kabuki style brush. I wear Light Neutral in the summer and Fair-light Neutral in the winter.

What is your favorite foundation? Comment below! I am always looking to try new things.

Beauty, Uncategorized

Brows 101: DIY Tinting

Before & After Brow Tinting

My jaw dropped the other day when I saw that it costs $20 to have your brows tinted at Ulta. That doesn’t even include waxing! It was then and there that I decided everyone needs to know that it is one of the easiest things you can do yourself to save some time and money. It only takes about 5 minutes and the cost of the materials is just over $20 and they will last you for years. This is not an exaggeration. I have had the same tube of brow tint and bottle of developer since 2014! So for the price of one brow tint at Ulta, you can DIY for at least the next 4 years. Sounds pretty good, huh?! Even better, you’ll use less eyebrow products when you do your makeup because the tint will do part of the work for you! I’ve written out all the steps here, but if you prefer to watch a video tutorial, go to my Instagram page (@butterandblushsc) and check my story highlights.

Things you will need to tint your brows:

1 cotton swab

Coconut oil or Vaseline

Small dish

Tint (I use natural brown, but if you have black hair, I recommend getting black tint)

Developer

Brush

2 cotton balls or cotton pads, dampened

Click here for a kit that comes with the tint, developer, dish and brush. Each individual item can also be purchased separately on Amazon.

1) With a small amount of Vaseline or coconut oil on your cotton swab, outline your brows. This thin layer of Vaseline or coconut oil will keep the tint from getting on the skin. (You don’t have to be too perfect about this. If you get any on the skin, it will fade after washing your face. This is just precautionary.)

2) Put a pea size amount of tint in your bowl. Add 3 drops of developer and mix with your brush so it becomes a paste.

3) With the brush and starting at the end of your brow, brush the tint on against the direction of your brow hair growth. Then starting from the other end, brush through them with more tint in the direction of hair growth. Make sure to get all the baby hairs on the ends that you want to be tinted so they show up!

3) Once both brows have tint on them, start a 3 minute timer. For a deeper color, you can extend the time.

4) Wipe clean with the damp cotton ball or pad and Voila! Beautiful tinted brows.

Tinting is recommended every 2-3 weeks, but you can do it as often as you like.

Beauty, Portfolio, Uncategorized

Makeup Monday: Jessica

Let me tell y’all about my best friend. This is Jessica and we have been friends since kindergarten. 25 years of friendship and she still puts up with me. Bless her. She settles my crazy like no one else and I’m extremely thankful for our relationship. She recently quit her job in oil and gas to pursue her dream of becoming a realtor in Austin. Her bravery to step out on her own and make a positive change for herself is so inspiring! I am super proud of her.

Jessica flew to Charleston last weekend to visit me for my birthday, so of course I had to glam her up for our night out downtown. When we were about to get started, I was thinking I was going to do some smokey neutral eye with a pop of gold on her when she said, “You know, I feel super fierce with red smokey eye.” And just like that, she busted me straight out of my neutral comfort zone and I thought, “GAME ON, SISTER,” but inside I was slightly terrified. Red eyeshadow just seems scary! But we did it and in the end she inspired me so much that I ended up doing a similar look on myself immediately afterward. The Jaclyn Hill palette from Morphe is the real show stopper in this look, specifically the shade, Cranapple.

Products Used:

Foundation: Tarte Rainforest of the Sea in Fair-Light Neutral
Concealer: Too Faced Born This Way in Snow
Powder: Cover FX Perfect Setting Powder
Bronzer: Physicians Formula Butter Bronzer in Light
Contour: Tarte Clay Play Eye & Cheek Palette Vol. 1
Blush: Tarte Amazonian Clay 12 Hour Blush in Risque
Highlighter: Anastasia Beverley Hills Illuminator in Starlight
Brows: Anastasia Dip Brow
Eyes: Jaclyn Hill Palette (Transition: Silk Creme, Crease: Hunts, Lid & Lower Lashline: Cranapple, Outer Corner: Chip & Jacz, Inner Corner: Enlight) & Colourpop Supershock Shadow in Lala tapped just on the center of the lid
Eyeliner: Ardency Inn Modster in Black
Lashes: Ardel Demi Whispies
Lips: Milani Color Statement Lipstick in Teddy Bare

Beauty, Uncategorized

Makeup Monday: Favorite Affordable Cruelty Free Products

I was going to title this “Favorite Cruelty Free Drug Store Products”, but not all of these can be found at your local CVS or Walgreens. Next to each item I have noted where I have seen each item sold and, if you click on the product, the link will send you where you can order it online.

I used to have this crazy idea that makeup had to be high end to be good quality. I don’t know where I came up with that (probably social media), but I was so wrong. I have tried $60 foundations that have flopped, while my most used foundation in my collection is under $13 (read more about it below)! Price really does not always dictate quality and I am here to tell you all the deets about my favorite affordable makeup products.

Foundation ::

Physicians Formula Healthy Foundation ~$11-13 (Walmart, Ulta, Target)
Hands down, this is the best drug store foundation that I have ever tried and I have tried several. I have combination skin that leans more to the dry end most of the time so I like this foundation because it’s hydrating, but it doesn’t slide off your skin. It comes in 16 shades and the finish is dewy without being sticky. I often choose this foundation over high end products because it’s just that good. I wear shade LN3. *Hint, a lot of places often run Buy One, Get One 50% off savings on Physicians Formula, so keep an eye out for a sweet deal!*

Bronzer ::

Physicians Formula Butter Bronzer $14.99 (Walmart, Ulta, Target)
This bronzing powder lives up to its name. It’s smooth and buttery on the skin and blends like a dream! The undertone is perfect because it’s not too orange or red, so it’s flattering on so many skin tones. There are 4 different shades to suit various skin tones. I wear the shade Light.

Blush ::

e.l.f. Cosmetics Powder Blush Palette $6 (Target, Ulta)
For the price, you cannot beat these blush palettes. There are two versions – one for lighter skin tones and one for darker skin tones (pictured above) – and they come with 4 shades in each. If I had one complaint, it is that they are a little bit dusty when you pick up the product on the brush making it a little messy in the compact. It doesn’t particularly bother me because they blend like a dream.

Milani Color Harmony Blush in Coral Beams $12.99 (Walgreens, Target, Walmart, Ulta)
This blush is a stunner. I typically don’t choose a blush with shimmer, but this warm toned shade is an exception because it goes on so smoothly and gives the prettiest glow. This product is a triple threat because I can skip bronzer and highlighter on quick makeup day because this one does it all. It is also a fantastic dupe for MAC Margin.

Lipstick ::

NYX Soft Matte Lip Creme $6.49 (Target, Ulta)
The name says it all…they’re soft, they’re matte and they have a creamy consistency. I love these lip cremes because they aren’t too drying, they’re long lasting and they come in a million different shades. It is a matte formula, but they don’t make my lips look cracked and scaly like a lot of mattes do. I love the shade Montreal.

Milani Color Statement Lipstick$5.99 (Walgreens, Target, Walmart, Ulta)
These lipsticks just feel good on the lips. They’re easy to wear and so comfortable. I personally love the shades Teddy Bare and Pretty Natural. Blend them together and you get a fantastic dupe for MAC Twig, which was one of my favorite shades before switching over to cruelty free products.

Gloss ::

NYX Butter Gloss $4.99 (Target, Ulta)
NYX coming in hot with another killer product. These glosses are soft, not sticky and don’t wear off giving that weird line on the inner rim of your lips. I know some of you know what I’m talking about! They also come in a ton of shades, so there’s something for everyone. My favorite color is Tiramisu.

Eyeliner ::

e.l.f. Cosmetics Lock On Liner & Brow Cream $4.00 (Target, Ulta)
This eyeliner comes in a little pot and is applied with a brush. I prefer this method for doing winged liner because I feel like I have more control with a brush rather than a pen style liquid eyeliner. I love the espresso shade for those with lighter skin tones because black can sometimes look a bit harsh.

Mascara ::

Essence 18 hr Volume $4.99 (Ulta)
This mascara packs a punch. It gives great volume and length and at under $5, you can’t beat it. My only complaint is that it’s a little heavy duty and can be difficult to remove.

Jordana Best Lash Extreme Volume Mascara $3.49 (Walgreens)
This brand is a new discovery for me. I decided to give my lashes a break from the Essence mascara mentioned above and really fell in love with this one. It gives my lashes a lot of oomf and doesn’t crumble or transfer.

Pixi by Petra Lower Lash Mascara $11 (Target)
To some of you, it may seem pretty extra to have a special mascara dedicated to your lower lashes, but I don’t care because this teeny tiny brush grabs every single lash and it never transfers onto the skin throughout the day. I love it and I never use anything else on my lower lash line anymore.

Lashes ::

Ardell $3.49-$6.49 (Walgreens, Target, Ulta)
I like Ardell lashes because they have a style for everyone. They have very subtle lashes, like the style Beauties, and they have big, voluminous styles in their Double Up collection. My personal favorites are the Demi 120 lashes because I like the tapered end to create a cat eye look. Next time I need a new pair, I’m going to grab some of the faux mink lashes because they look so lightweight and comfortable.

Setting Spray ::

Morphe Continuous Setting Mist $15 (Ulta)
This is the only setting spray I’ve ever used that comes in an aerosol can. It’s pretty genius because the product comes out in such a fine, even mist. I’ve tried other products, but I keep coming back to this one.

What are some of your favorite cruelty free products? I am always looking for new things to try out!

Beauty, Uncategorized

Makeup Monday: 15 Minute Makeup


I have been challenging myself lately to see just how quickly I can get ready. There are definitely days when I can (and want) to spend an hour doing my hair and makeup, but those days are few and far between. Most of the time, I only cleanse my skin and apply moisturizer and SPF, but there are days when I want to do a little more so I feel more put together when I’m out and about. As every mama knows, speed is the key to anything in this life and that’s where these makeup tips will come into play. Last week, I actually timed myself! Here is the screen shot to prove it:

img_0669

FIFTEEN MINUTES, Y’ALL! I wouldn’t say I was racing through it, but when I am trying to get ready quickly, I prioritize. For me, the most important things to make me look fresh and awake are: a more even complexion because I have a lot of redness on my cheeks and dark circles (#momlife), mascara to open up the eyes, brows to frame my face and something on my lips. I used lipstick for this post, but even just a clear balm makes my lips look healthier.

I like this look because it requires minimal everything – time, products and tools. My primary tip for getting ready quickly is to use minimal products. You will notice that I don’t necessarily skip any part of the face, it’s just all simplified. I used the same bronzer, blush, and highlighter on my cheeks and my eyes. One other little tip would be to keep the makeup and brushes that you’ll use for a quick makeup look separate from all of your other products. That way, when you’re in a hurry, you can grab only what you need and you won’t have to look for anything. The less time you spend digging through your bag or drawer, the faster you’ll be.

There are minimal tools required for this – only 3 brushes and a damp beauty sponge. I listed the products that I used, but I recommend using whatever you already have and like. These items are just my favorites these days, so unless you’re looking for something new, stick with what you love.

Here’s how you can create this look on yourself:

1) Base: With a Real Techniques beauty sponge, blend out Physicians Formula Healthy Foundation all over (nothing new here!).
2) Conceal: Dot a small amount of Tarte Shape Tape Concealer (I used Fair Neutral) under your eyes and with the same sponge, tap and blend that in. Use whatever is leftover on the sponge to conceal the tops of your eyelids to eliminate any veins or discoloration.
3) Set It: Then, dip the same sponge into some Cover FX Perfecting Powder and tap it over the concealer to set it.
4) Bronze: Swirl a Morphe R2 brush in Physician’s Formula Butter Bronzer (I use the Light shade), tap off the excess and apply it to the top of the forehead and the cheek bones to warm up your face and give it a little definition.
5) Blush: With a Morphe E4, apply Tarte 12-Hour Blush in Risque to the apples of your cheeks.
6) Highlight: With your finger, apply a little Colourpop Lunch Money Highlighter to the tops of your cheeks, inner corner of your eyes and down the center of your nose (and the very tip of your nose if you like that.)
7) Eyes: With a Morphe M504 brush, apply the same bronzer to the crease of your eyes and blend up toward the brow. With the same brush take a little of the blush and do the same thing. This is going to create some definition on your eyes, as well as a really nice monochromatic look across your whole face. Apply some Essence 18 hr Volume Mascara on your top lashes and Pixi Lower Lash on bottom.
8) Brows: Use a tinted brow gel (I used Tarte Busy Gal Brows in Taupe) to add some color and definition, but also to keep those babies in place.
9) Lips: Finish it off with some Milani Color Statement Lipstick in Pretty Natural.

If you decide to give this a go, time yourself and let me know how long it takes you!

Beauty, Portfolio, Uncategorized

Makeup Monday: Kayla


Meet Kayla, Maddie & Olivia’s babysitter and one of the sweetest souls I’ve ever met. She has the prettiest brown eyes ever! This look was really fun for me because, thanks to her Dominican roots, she has really beautiful dark skin. Since her skin is basically the polar opposite of mine, I knew I wanted to use deep eye shadow shades that I wouldn’t typically use on myself and really bronze her up. I love how this look turned out!


Products Used:

Too Faced Hangover 3-in-1 spray
Maybelline Fit Me Matte & Poreless (I am aware that this is NOT cruelty free, so don’t come at me, bro. I did not have a foundation match for Kayla, so we used what she had in her make up bag.)
Tarte Shape Tape in Light Neutral
Cover FX Perfect Setting Powder
Anastasia Contour Kit
Cargo Highlight in Bronze & The Balm Mary Lou-minizer
Tarte Amazonian Clay Blush in Journey (limited edition shade from their Holiday 2017 collection)
Morphe Jaclyn Hill Eye Shadow Palette (shades used: Cranapple, Firework, Meeks, Central Park, Beam, Abyss)
e.l.f. Lip Palette
Ardell Demi Wispies Lashes
Morphe Setting Spray
Real Techniques Sponge & Morphe Brushes for Application