Uncategorized

Mama’s Meatloaf

I posted about meatloaf on Instagram and my messages exploded for the recipe, so here you go! It’s nothing fancy, but it’s one of those childhood comforts that I always come back to. My kids devour it and it’s SO easy. I love it with mashed potatoes and blanched broccoli because that’s how my mama serves it.

1lb of lean ground beef (sometimes I do half turkey, half beef)
1/2 onion chopped small
1 tbs mustard
1/2 c ketchup
1/2 c bread crumbs
1 egg
8 oz can tomato sauce
Salt and pepper

Soften onions in a skillet on medium high with a little oil and salt & pepper. Allow to cool a bit.

Mix all ingredients together except the tomato sauce. Salt and pepper (or use Nature’s Seasons blend) liberally.

Separate into muffin tins (will make about 8).

Top with tomato sauce.

Bake 350 for 30 min.

Uncategorized

So you’re having your picture taken…

Thank you to Lindsey Reid Photography for these gorgeous images.

Prep.

I would argue that prepping is the most important thing you can do to achieve flawless application. I will say it until I am blue in the face (and I’m saying it loudly for those in the back!): YOUR MAKEUP WILL ONLY LOOK AS GOOD AS YOUR SKINCARE ROUTINE. I am NOT saying you need to follow 17 steps morning and night and spend thousands on high end night creams to have great results. I am saying that cleansing, toning, moisturizing, SPF and regular exfoliation and masking are a huge part of having a nice, smooth finish with your foundation.

When I want my makeup to look it’s absolute best, I do either a  hydrating or exfoliating mask the day before (this one is great for hydration and this one provides enzyme exfoliation) and dermaplane my face and neck. Dermaplaning is just a fancy word for shaving your face. Yep, you read that right. I shave my face! The night before I have photos taken, I cleanse my face to remove all makeup and debris, suds it up with cleanser again and use a men’s razor to remove all of the peach fuzz from my face and neck. The exfoliation you get from removing the peach fuzz and top layer of skin is incredible. It also allows for maximum absorption for all of your skincare products.

I also like to tint my brows 1-2 days before a photo session. They have better shape and fullness with tint and I don’t have to use as much product on them when it’s time to get ready.

The day of the photo session, I cleanse, tone and moisturize my face and neck and allow it to soak in for at least 10-15 minutes, then apply primer and allow it to soak in for several minutes as well. It’s important to allow those products to absorb before you start applying foundation or it will just smear around on top. Skip SPF products, especially if you are doing a studio session with lights. It can cause flashback making you look ghostly.

Color Selection is key.

I am saying this because I have made mistakes in this area before. I remember spending so much time perfecting a warm summery look, just to get my photos back and be disappointed that I looked a little too orange. Mindful color selection goes for all of your products from foundation to eye shadow to brow products. Here’s the cliff notes about color selection:

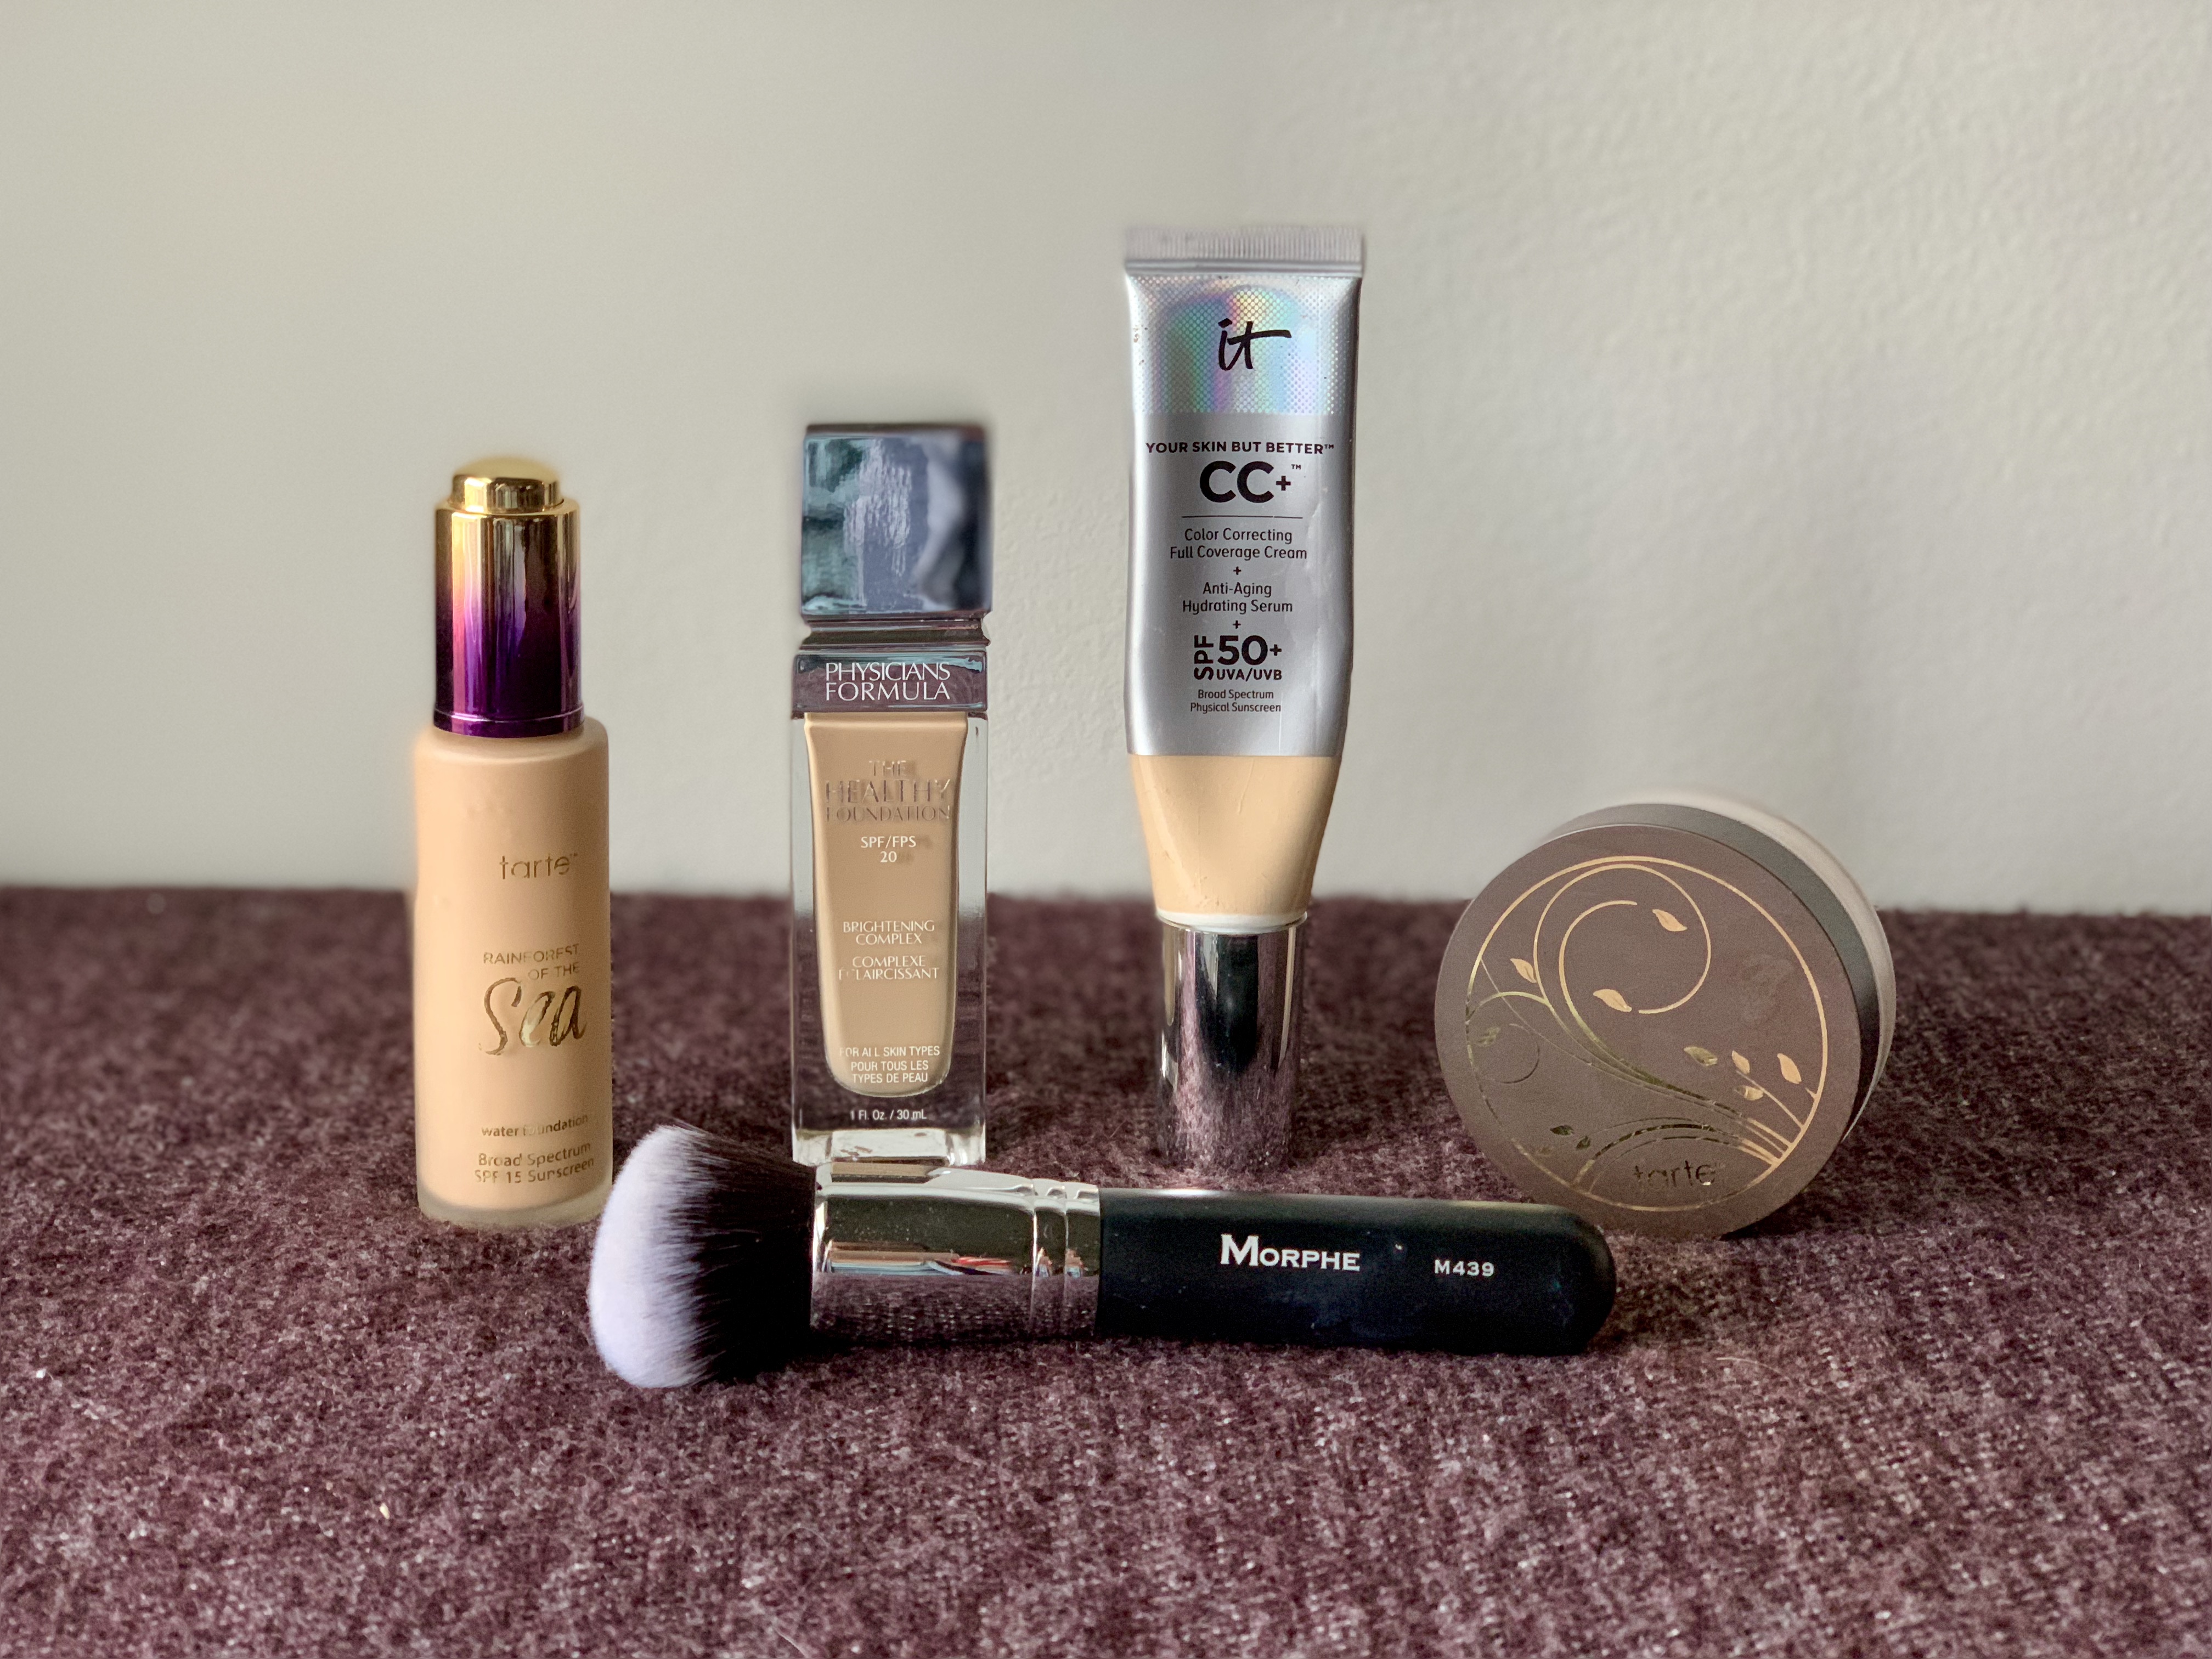
If you struggle with getting a good foundation match, go to Sephora or Ulta and have a professional help you – that’s what they are there for and you don’t want to appear like you are wearing a mask. Under eye concealer should be ONE shade lighter than your foundation – don’t go too light because it looks unnatural and ghostly. For bronzer, select something neutral and matte (Tarte Park Ave Princess is a great one for fair to medium babes). Generally speaking, choose a blush tone that is on the neutral spectrum as well, nothing too orange or peach and nothing too purple.

Watch Your Sparkle.

Matte bronzer, blush, and eye shadows will be picked up best by the camera. If you go crazy with shimmery products, the result may leave you looking greasy or sweaty. Strategically placed highlighter on the cheeks, inner corner of the eyes and brow bone will create a beautiful glow, but you don’t want your entire face to shine.
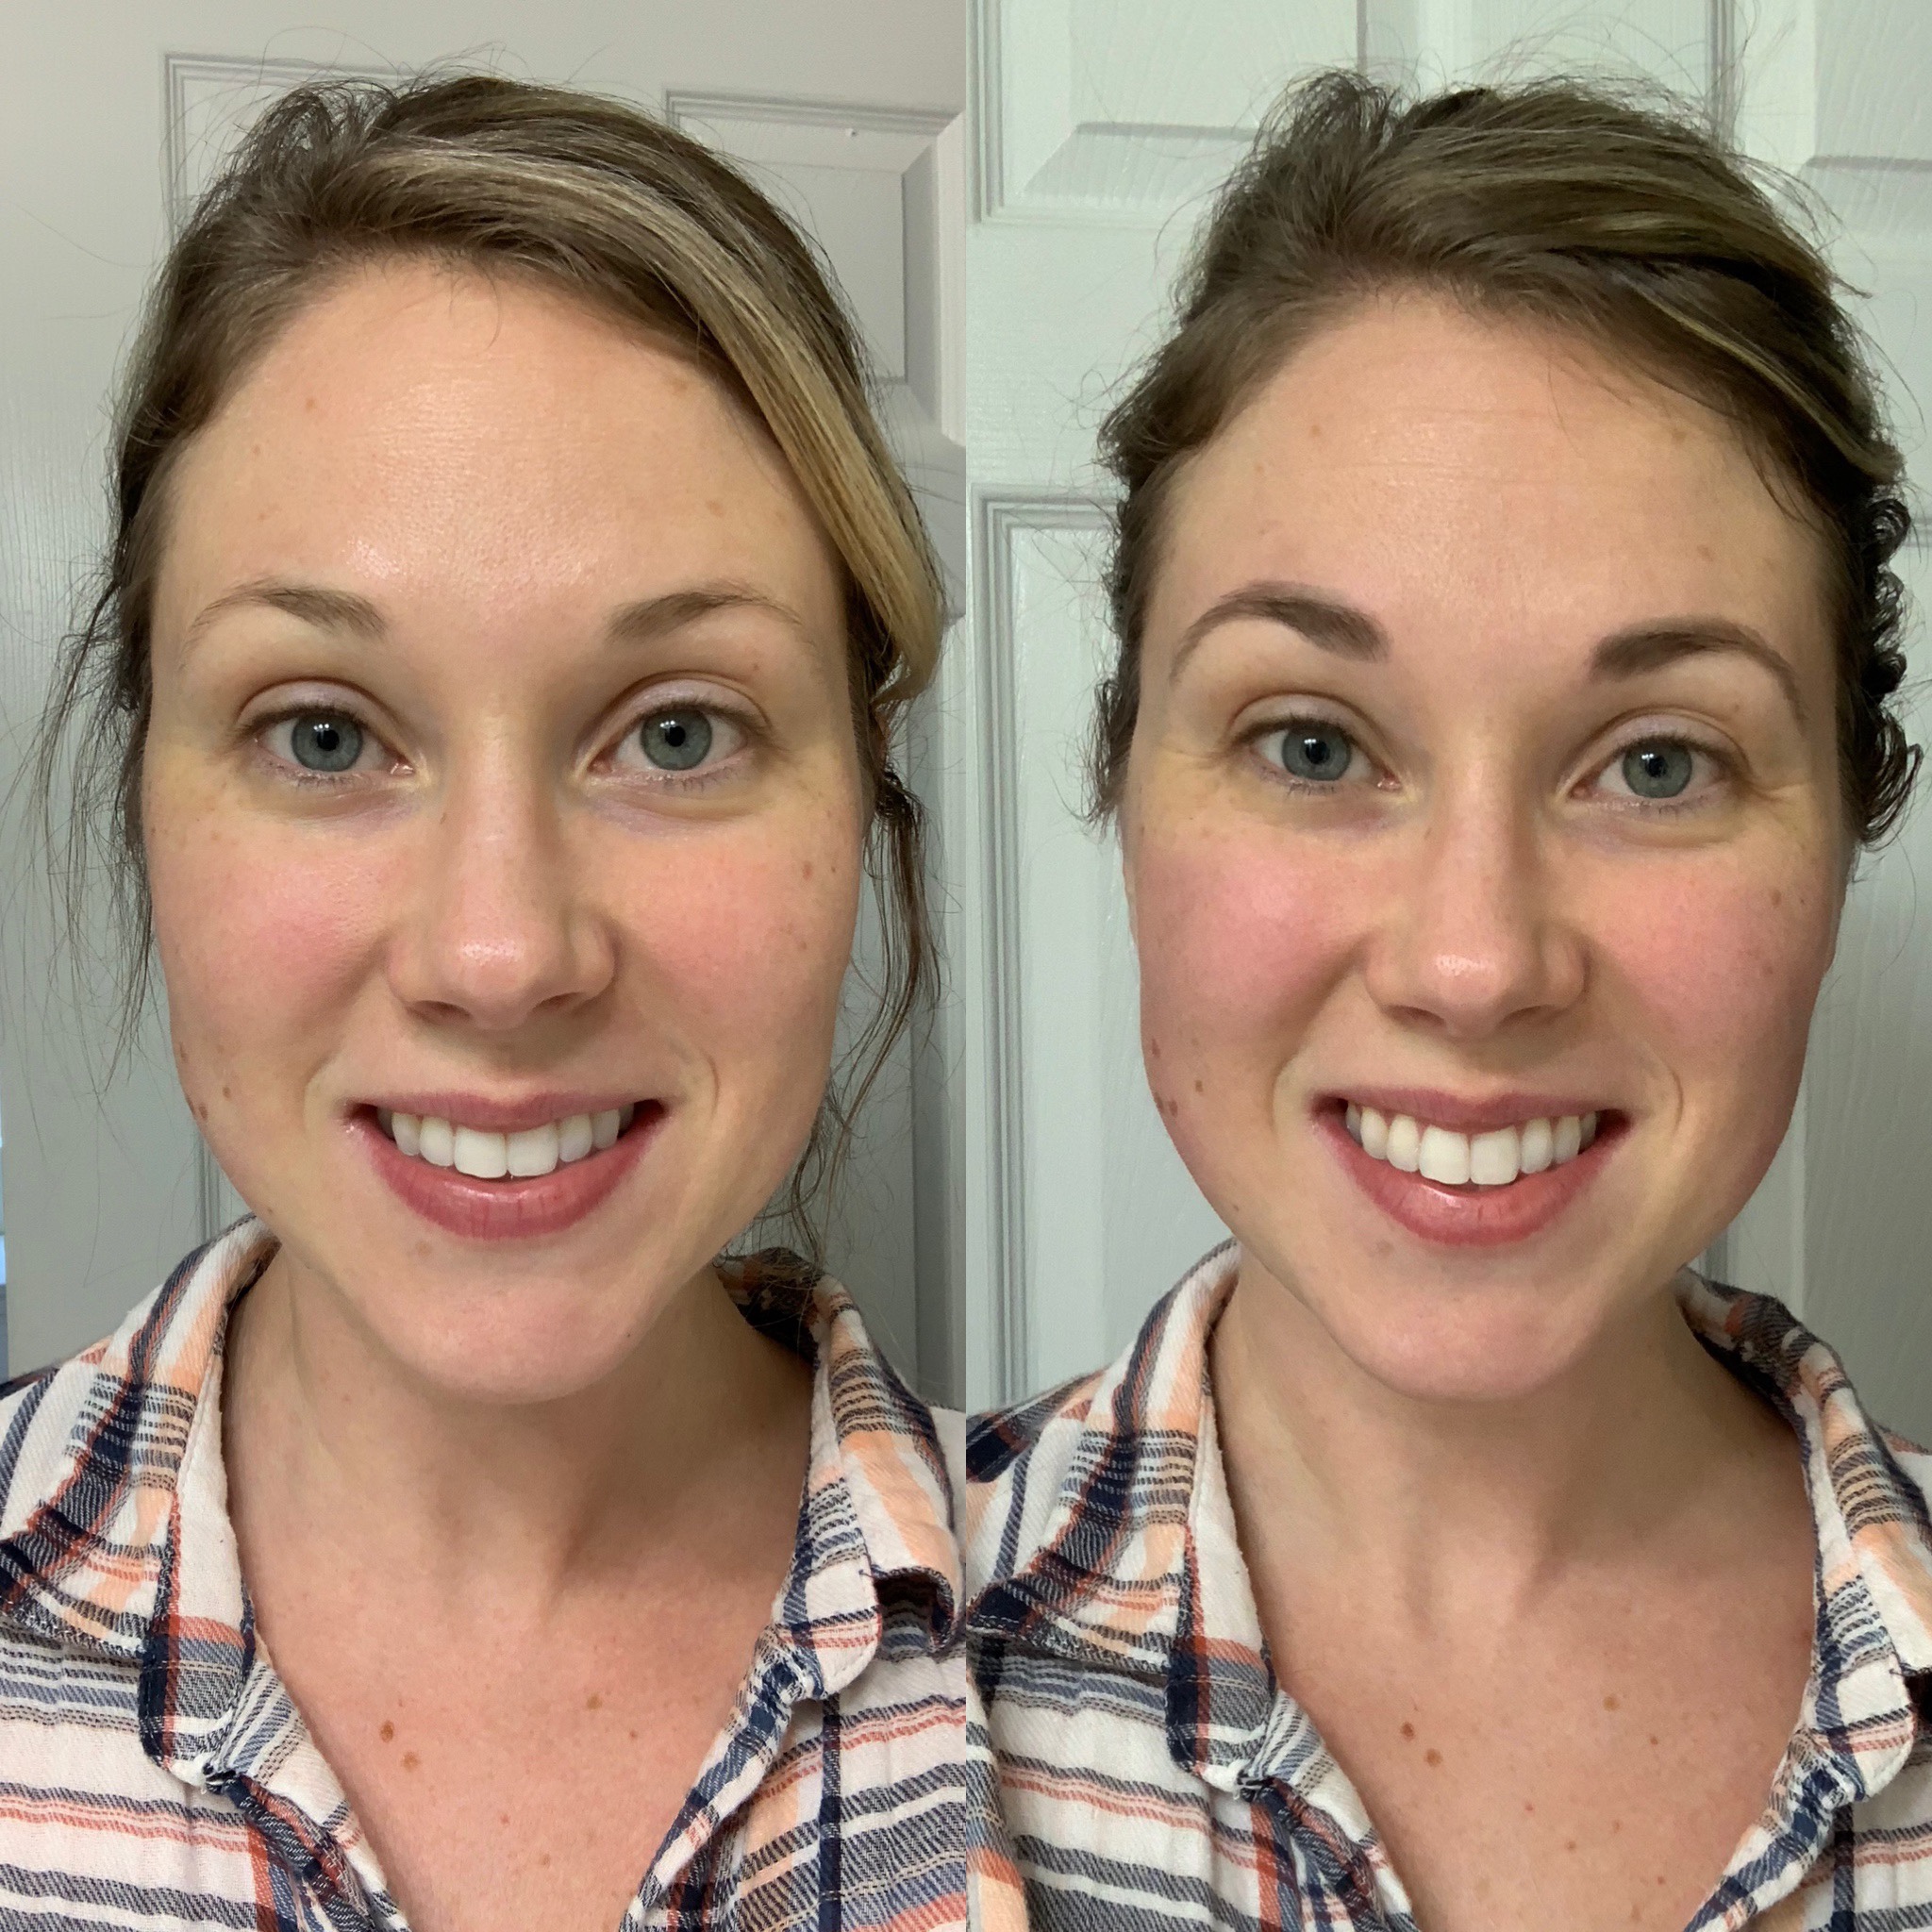
Make It POP!

The makeup you apply when you’re going to have your picture taken should be a little more intense than your day to day look. It doesn’t matter whether you’re taking pictures outside or in a studio, the camera tends to wash you out. Darken the outer corner of your eyes with a deep chocolate eye shadow. Smudge a dark brown or black liner across your top lashes. Go a little heavier with your bronzer or contour shade.  And don’t be shy with your blush! I promise you won’t look like a clown in the pictures. When you look at yourself in the mirror, your cheeks should really pop!

Don’t skip on lashes.

If at all possible, wear falsies. They have so many styles of lashes these days and even the ones marketed as “natural” will make a huge difference. If wearing false lashes is way out of your comfort zone, then don’t skip a tight line of eyeliner hugging your top lashes, curl them well and put a hefty coat or two of mascara on. This will create a wide open effect on the eyes, which is stunning on everyone.

Uncategorized

Chicken Thighs & Broccoli with Garlic Cream

Yesterday I gazed into the fridge blankly and found a bunch of chicken and broccoli that all needed to be cooked. I could have just roasted it all and everyone would have been fine with that, but I really wanted to do something different. I went straight to Pinterest and read a bunch of recipes and kept coming up short by 1-2 ingredients. Given that I had ZERO motivation to go to the grocery store with two toddlers in tow, I decided to improvise and came up with this. Let me tell ya…it was SO delicious. My husband said he loved it, but would have really enjoyed a little “kick” so I’m including cayenne pepper in the ingredients. I do think it would have been a great addition, but I’m not sure the kids would have liked that. It’s completely optional, so leave it out if you prefer mild flavor.

Ingredients:

2 lbs boneless skinless chicken thighs (approximately 8)

salt & pepper to taste

1/4 tsp cayenne pepper *optional

1/2 tsp paprika

4 TBS butter, divided

4 cloves of garlic, minced

3 cups of broccoli, chopped

1 cup heavy cream or half & half

1/2 c chicken broth or water

Instructions:

1) Melt 2 tablespoons of butter in a large skillet on medium high heat. (I use my 12 inch cast iron.) Sprinkle both sides of chicken with salt, pepper and paprika.

2) Sear each side of the chicken thighs until each side is brown and they are nearly cooked through (about 3-4 minutes each side). Remove to a plate and cover with foil to keep warm.

3) Add last 2 tablespoons of butter to the hot pan and allow to melt. Throw in the garlic and immediately stir until fragrant being careful not to let it burn (approximately 1 minute.)

4) Pour in the liquids of your choice (heavy cream or half and half and chicken broth or water.) And stir with a whisk to pick up all the brown bits from the pan. Add cayenne pepper and stir well to combine. Add a pinch of salt if you used water instead of broth.

5) Once the cream mixture is bubbling, turn down to low. Add the broccoli to the pan and lay the chicken on top of the broccoli.

6) Cover and allow to simmer on low about 5-6 min until broccoli and chicken are cooked through.

7) Remove from heat and serve immediately. Broccoli will become over cooked and mushy otherwise.

Uncategorized

Makeup Monday: Tips for Mature Skin

I truly believe that makeup is a creative outlet. I think that when applying makeup to your own face, you should do whatever you think looks best and not be held back by rules that someone else lays out for you. The tips I’ve listed below are general guidelines that I find to be the most universally flattering on mature skin. For example, if you love black eyeliner and you like the way it looks on you, you do you! The thing that makes a person look their best is confidence, so glam yourself accordingly!

1) Hydrate the Skin: Before doing your makeup, whether you have mature skin or not, you need to cleanse, tone and moisturize your face and neck. With mature skin, this is extra important to create the smoothest canvas possible. The skincare you apply will plump the skin and improve the appearance of fine line and wrinkles, as well as moisturize any dry patches.

Side note: I always advise waiting 10-20 min after doing your skincare routine before applying foundation because it gives the products time to soak in. If you go too quickly, the foundation will likely smear around on top of the moisturizer and leave you looking streaky. The same goes for makeup primers. You should allow them to settle into the skin for a few minutes before applying foundation.

Product Recommendations: Skincare – Dermalogica Age Smart Line or Pacifica Dreamy Youth Day & Night Cream, Primer – Stila One Step Correct (I used this on my mom for this look) or NYX Hydratouch Primer

2) Go easy on the shimmer: Because mature skin tends to have more fine lines and wrinkles, shimmery products are only going to accentuate them. That’s not to say that someone with this skin type cannot use highlighter or shimmery eye shadows, they just have to be a bit more particular about which products they use.

Product Recommendations: Hourglass Ambient Lighting Powder (I used shade Luminous Light on my mom) or Essence Pure Nude Highlighter

3) Go softer on the eyeliner color: This is a tough one…I do love a good smokey eye with black eyeliner applied properly on virtually anyone. BUT it can be quite harsh, especially on mature Caucasian skin. I even usually prefer softer colors on myself and I’m only thirty! If you have darker skin, it can stand up to black eyeliner more easily, but the contrast against light skin can be a little abrupt. Opt for charcoal, dark brown, or plum instead.

Product Recommendation: Pixi Endless Silky Eye Pen in Matte Mulberry or Black Cocoa

Do you have mature skin? What are your favorite products? Please share!

Recipes, Uncategorized

Shortcut Sausage + Veggie Spaghetti Sauce

I wish I was that mom who cooks homemade spaghetti sauce from scratch and lets it simmer all day on the stove while the whole house gets engulfed in yummy smells as the anticipation for dinner builds, but I’m just not. I just don’t really have the time, I am always running in and out of the house (and I assume leaving your stove on when you are not home is frowned upon?) and I just don’t think that far ahead these days. That’s why I am a big ol’ cheater and use jarred marina sauce for this “recipe”. I do dress it up a little with some spices, but for the most part, I just let that jar of red goodness do it’s job. Also, “recipe” is a generous term because this is more like a “throw whatever you want in a pot and go with it” sort of situation. It’s easy, it’s delicious, my kids will actually eat it and it’s great leftover. This is yummy to eat alone or over pasta or zoodles.

This comes together in about 20-30 min if you’re in a pinch, but if you want to let it simmer longer, you can definitely do that too!

Ingredients:

2 lbs ground Italian sausage
1/2 large onion
8 oz sliced mushrooms, chopped smaller if you prefer
2 medium zucchini, chopped*
2 tsp Italian seasoning
1/2 tsp red pepper flakes, more to taste

1) Brown the sausage and onions over medium-high heat breaking up the sausage.
2) Add the mushrooms and zucchini and stir occasionally as they soften.
3) Season with Italian seasoning and red pepper flakes. Stir to combine.
4) Add the marinara, bring to a boil, then reduce heat to low. Allow to simmer for at least 5  min, but up to 30 min.
6) Top with a little parmesan if you’d like and stuff your face!

*You can leave the zucchini out and spiralize them for zoodles instead and pour the sauce over top.

Uncategorized

Five for Friday: Holiday Gift Guide Edition

Tis the season for gift giving, so today’s Five for Friday links are things that have caught my eye as I’ve browsed the internet for Christmas gifts. Hope this gives you some inspiration as you check off your list this year!

Beauty :: The shades in this lipstick set are so pretty! You could gift the whole set or separate them for individual stocking stuffers. You can’t beat Bite Beauty’s Amuse Bouche lipstick formula and the set of 4 is currently on sale for only $15! If you’re looking to spend a little bit more, this Tatcha set has all the cult favorites for $60. Every beauty lovers dream!

Food :: Need a gift for a coworker, neighbor or boss? This double dark hot chocolate mix sounds delicious. They also have sets with multiple flavors if you want to go that direction. Leave it to Williams Sonoma to provide the world with boujee hot cocoa mix, ya know?

Fashion :: Am I the only one who thinks Old Navy has majorly stepped up their game in the last year or two? These pajama pants would be such a great gift for any lady in your life (they also have great kids’ and men’s jammies too!). They come in so many patterns from plaids to polka dots to silly winter themed critter prints, so there’s something for everyone! I also love Old Navy’s workout clothes. Their compression leggings are great and under $40 depending on the style. Such a great gift for any workout guru you are shopping for! Bonus: Old Navy nearly always has a sale going on, so you can likely get a great deal on these items!

Home :: You know that smell when you walk into a spa? It’s clean and fresh and earthy. My goal is for my house to smell like that all the time. Unfortunately, we cook too much bacon around here for that to happen, but I think this candle probably smells like exactly what I am going for. There are also other winter and Christmassy scents available and the price point is just right ($13-26 depending on the size).

Random/Miscellaneous :: We got this neck massager a year or two ago and it is awesome! It would be the perfect gift for anyone on your list, but especially someone that lifts weights. It’s perfect for post gym relaxation.

Beauty, Uncategorized

Makeup Monday: Current Favorite Foundations

img_1949

There are so many foundations on the market and it can be super overwhelming to make a decision. Foundation preferences are also very personal. Do you want light, medium or full coverage? Radiant, natural, satin or matte finish? Is your skin dry, oily or combination? What type of formula – powder, liquid, cream? And then there’s finding the right color match! Absolute overload of decisions. My number one recommendation for buying foundation is this – if you are buying a high end foundation, go into a store like Sephora or Nordstrom to have an associate color match your skin and get a few samples of different foundations to try at home first. This will give you the opportunity to test drive each product a couple of times and decide which is right for you.

If you are on a smaller budget and want to purchase a drug store foundation, I recommend buying from Ulta or Target because they are really flexible when it comes to returns. Just keep your receipt and even if you have opened it and used it a few times, they will still accept the return if you change your mind.

I have mostly dry skin, but I can get oily in my t-zone, especially during the summer. That said, my foundation choices tend to be on the natural to dewy side because most matte formulas cling to my dry areas and look patchy. If you have oily skin, the liquid foundation options below may not be your best choices, but that’s not to say that you couldn’t try them and see how they work for you. You will probably just need to use an oil controlling primer and set your oily areas with powder for these foundations to work for you.

Tarte Rainforest of the Sea Water Foundation ($39) :: There is something really magical about this foundation. You can layer it to get more coverage, but it still looks seamless and skin-like. At the end of the day, my skin will look dewy, but not greasy and it doesn’t break apart like some foundations do after a few hours. This is my go to choice for a nighttime makeup look. I wear Light Neutral in the summer and fair light neutral in the winter.

it Cosmetics Your Skin But Better CC+ Cream ($38) :: I love that this foundation has SPF 50. It’s great for summer days when you’ll be outside. I also love the coverage – it is medium to full coverage which is impressive for a CC cream. Fair Light is my perfect shade match, but I also use Fair to mix in with other foundations that are a touch too dark.

Physician’s Formula Healthy Foundation ($12.99) :: I’ve mentioned this foundation on here a lot because this is my number one choice for daily use. It wears beautifully all day long, looks like skin but still has great coverage. Bonus, it has SPF 20. The other great thing about this one is that stores often run specials of Physician’s Formula products (specifically buy one get one 50% off). I don’t know about you, but I can definitely get behind a foundation that I can snag for under $10! I wear shade LN3.

Tarte Amazonian Clay Full Coverage Airbrush Foundation ($36) :: Do you remember about 10 years ago when that Bare Minerals loose powder foundation was the jam?? This is a similar product, but better in my opinion. I like this foundation because it’s really easy to apply and layer to the level of coverage that I want. It’s best applied with a kabuki style brush. I wear Light Neutral in the summer and Fair-light Neutral in the winter.

What is your favorite foundation? Comment below! I am always looking to try new things.

Beauty, Uncategorized

Brows 101: DIY Tinting

Before & After Brow Tinting

My jaw dropped the other day when I saw that it costs $20 to have your brows tinted at Ulta. That doesn’t even include waxing! It was then and there that I decided everyone needs to know that it is one of the easiest things you can do yourself to save some time and money. It only takes about 5 minutes and the cost of the materials is just over $20 and they will last you for years. This is not an exaggeration. I have had the same tube of brow tint and bottle of developer since 2014! So for the price of one brow tint at Ulta, you can DIY for at least the next 4 years. Sounds pretty good, huh?! Even better, you’ll use less eyebrow products when you do your makeup because the tint will do part of the work for you! I’ve written out all the steps here, but if you prefer to watch a video tutorial, go to my Instagram page (@butterandblushsc) and check my story highlights.

Things you will need to tint your brows:

1 cotton swab

Coconut oil or Vaseline

Small dish

Tint (I use natural brown, but if you have black hair, I recommend getting black tint)

Developer

Brush

2 cotton balls or cotton pads, dampened

Click here for a kit that comes with the tint, developer, dish and brush. Each individual item can also be purchased separately on Amazon.

1) With a small amount of Vaseline or coconut oil on your cotton swab, outline your brows. This thin layer of Vaseline or coconut oil will keep the tint from getting on the skin. (You don’t have to be too perfect about this. If you get any on the skin, it will fade after washing your face. This is just precautionary.)

2) Put a pea size amount of tint in your bowl. Add 3 drops of developer and mix with your brush so it becomes a paste.

3) With the brush and starting at the end of your brow, brush the tint on against the direction of your brow hair growth. Then starting from the other end, brush through them with more tint in the direction of hair growth. Make sure to get all the baby hairs on the ends that you want to be tinted so they show up!

3) Once both brows have tint on them, start a 3 minute timer. For a deeper color, you can extend the time.

4) Wipe clean with the damp cotton ball or pad and Voila! Beautiful tinted brows.

Tinting is recommended every 2-3 weeks, but you can do it as often as you like.

Uncategorized

Five for Friday! (…on a Saturday)

A friend sent me this yesterday and there’s basically nothing that describes my life better.

Sorry this is coming at you a little late this week. I have had obligations every single day and then yesterday (Friday), my mom and step-dad had to put down our family dog back home and it was ROUGH. I needed to just take a minute, press pause on my obligations and to-do list, order a pizza and watch a movie with my kids. And I did exactly that and it was just what my brain needed. Here’s what caught my eye this week:

Beauty :: Not sure if I’ve mentioned it here, but I have been changing over all of my skincare to Dermalogica. For many years now, I have mix and matched my skincare products to whatever I heard was good through influencers or was highly rated on Sephora’s website. My skin has become extra dry since having Maddie and Olivia and is showing signs of aging, so I decided it was time to create a regimen using one skincare line. The thing about sticking to one brand is that the products are made to work well together and you’re more likely to get the results you are after. I’ve gradually purchased Dermalogica products over the last few months and the last thing I need to add to my collection is a mask. I would like to try this mask soon and see if it gives my face the extra boost it needs to survive the winter months.

Food :: I’ve been in a food rut lately always falling back on the same basics. I grabbed a jar of artichoke hearts the other day at Sam’s and I think I’m going to get creative with them this weekend. I’m thinking something sorta like this recipe for Creamy Artichoke Chicken. Maybe I’ll throw in some spinach to do a spin off of spinach artichoke dip. If you have some good fall recipes to share, please send them my way! I need out of this rut.

Fashion :: Have you ever gone into the Loft store and touched anything from the Lou & Grey collection? Holy guacamole. Everything is so soft and cozy. It’s taking a lot of strength not to buy these jogger style pants, but $69.50 is a little steep for comfy pants, so I am going to keep my eyes open for a sale. Maybe Black Friday?!

Home :: A few months ago, I had the brilliant idea that I would wash my throw pillows from my couch. They were dirty from coffee spills and kids throwing them on the floor. Side note: Am I the only mother who feels like they pick up the same pillows up off the floor approximately 63 times per day? DRIVES ME INSANE. Anyway, back to the washing…I threw them in the washer on a cold delicate cycle hoping that they would come out okay…WRONG. The colors bled and it ruined them, so I’ve been on the hunt for new ones for a while, but I just can’t bring myself to spend a week’s worth of grocery money on throw pillows. So my splotchy pillows remain featured on my couch. These patterned covers with tassels from amazon caught my eye, so if I can find some inexpensive pillows to fill them, maybe I’ll go that route. Or I’ll just hit up my local HomeGoods because I’m sure they have a million options.

Random/Miscellaneous :: I have been wanting to add a floating shelf to my bathroom to get some of my toiletries off the countertop. We don’t have a lot of counter space and it gets very cluttered. I am thinking this might be just what I need. And $13.99 sounds just right!

I hope everyone has a great weekend gearing up for Thanksgiving!

Uncategorized

Sausage + Veggie Frittata

A sub par photo for a not so sub par dish.

If you’re not eating squash with your eggs yet, then I’m not really sure what you’re doing with your life. Whether you’re meal prepping for the week or need something to take to a potluck, this frittata never fails! It’s packed with veggies and protein and there’s really no better way to start your day. If you prefer a vegetarian dish, you can easily leave out the sausage and add extra veggies instead. The cheese is also optional and feel free to use a plant based milk instead of heavy cream. Enjoy!

Ingredients:

1 lb breakfast sausage

1 medium onion, chopped

1 yellow squash, sliced

1 zucchini, sliced

1 large tomato chopped

10 eggs

1/2 cup heavy whipping cream or milk of your choice

2 tsp dried basil

1 cup of shredded cheese (I prefer either mozzarella or cheddar)

Salt & Pepper to taste

Directions

1) Preheat oven to 350 degrees. Grease a 9×13 casserole dish.

2) Brown the sausage and onion in a large skillet over medium-high heat until cooked through.

3) Add zucchini, squash and a pinch of salt & pepper and sauté until they become crisp tender.

4) Pour sausage & veggie mixture into prepared dish and spread evenly. Layer chopped tomato on top.

5) In a separate bowl, crack the eggs and add the heavy cream, basil, salt and pepper. Mix with a fork until well combined.

6) Pour egg mixture evenly over sausage, veggies and tomatoes. Top with your choice of grated cheese.

7) Bake 30-40 min until frittata is bubbly around the edges and the center is set.